Thursday, 29 November 2012

Apple Banana Walnut Danish


This is my 100th published post. Wow. I can't believe 100 posts ago I was saying hello to absolutely no one, and now I have written 100 posts. Sometimes it is a struggle, doing this, especially on holidays, when I just want to curl up in air conditioning, swim and eat all day. But other times, it is the best thing I do all day. I love every single comment I get, every single page view. I am so thankful for everyone who takes the time to read this blog. You make me very happy.

In other news about me - I got my final marks back for this semester of uni. Safe to say I passed and have one more year left. This time in a month I will be in America with my lovely friend Meg, who lives in Boston. Holidays are going well so far and this weekend is shaping up to be a good one - heading out tonight with my high school girlfriends, tomorrow is one of my best friend's (Will, I've mentioned him before I believe) birthday, and spaghetti pie will be made and consumed over the weekend. 


Now, onto these amazing danishes.

This is probably my favourite thing I’ve made this year, apart from those Skinny Fudgy Banana Peanut Butter Brownies. I absolutely loved these danishes; I love pastry though. These are very easy to make and not that time consuming. If you don’t mind putting in a little bit of extra effort on a Sunday morning within an hour you can have the most amazing danishes fresh from the oven.

The apples are soft and perfectly caramelised. The cinnamon, vanilla, banana, raisins and walnuts really just add a bit of texture, flavour and difference to the danishes. These guys beat regular apple danishes, because of the faint banana flavour, the crunch of the walnuts, and the chewy raisins. When fresh from the oven the apples practically melt in your mouth, and the pastry is perfectly crunchy.


While the drizzle is optional, I definitely recommend it. It is a very sweet icing, but perfectly delicious and very simple to make. It definitely adds something to the danishes; the sweetness of the icing contrasts with the tart apples and butter pastry. Worth the extra minute it takes to mix it together.


Makes 2 large danishes. Serves 4-6, depending on how you slice the danishes.

What you need:
2 apples
1 tsp lemon juice
2 tbsp brown sugar
2 tbsp butter
½ cup chopped walnuts
1 large mashed banana
1 tsp cinnamon
½ cup raisins/sultanas
1 tsp vanilla
2 sheets puff pastry
1 egg

For optional drizzle:
½ cup icing/confectionary sugar
1 tbsp milk

What to do:
Preheat the oven to 200 degrees Celsius.

Peel and core the apples, and chop into small pieces. In a large bowl, combine the apples, lemon juice and brown sugar.

Takeout the puff pastry sheets and allow to defrost.

Melt the butter in a frypan over medium heat. Add the apple mixture to the melted butter and let the apples cook for around 10 minutes. Mine took 9 minutes. What you want is the apples to caramelise so they have browned slightly and taste vaguely caramel. When the apples are tender, remove them from the heat. Allow to cool for a few minutes.

In a new bowl, combine the walnuts, banana, cinnamon, raisins and vanilla. Mix together well with a wooden spoon. Add the caramelised apples and mix together well. The banana mixture should be rather wet and stick to bits of the apple.

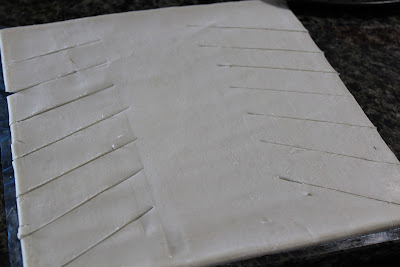
By this time the puff pastry should be well and truly defrosted. One sheet of pastry will make one danish. On the left side of one sheet of pastry, make horizontal or slightly angled cuts. Do the same on the right side of the pastry. Make sure the cuts do not meet and instead create a rectangle of pastry in the centre which has not been touched. See related picture.


Repeat for other pastry sheet.

Divide the apple and banana mixture between the pastry sheets so each Danish is filled with half of the mixture. Fold each corresponding strip of cut pastry over the filling, angling the pastry strips down the centre of the danish. The strips will cross over each other. Repeat for the remaining pastry strip, except the bottom two strips. Cross these strips with each other as well, but angle the pastry upwards. This way each end of the danish has an open end. See related picture.


Repeat for other pastry sheet.

Whisk the egg in a small bowl and wash both Danish pastries with it. This will help the pastry to brown in the oven.

Bake in the oven for 15 minutes or until the pastry has browned and is crunchy.

While the danishes are cooling, mix together the icing. In a small bowl, combine the two ingredients. When a thick paste has formed, place it in a ziplock bag. Smoosh the icing into one corner of the bag, cut off the corner and drizzle out the icing over the danishes in any pattern you chose.


Sunday, 25 November 2012

Chocolate Banana Bread


It is now less than a month until Christmas! And, just over a month until I go to America. I'm pretty excited about it all - and like I've said before, if anyone has any suggestions on where to go in Boston/MA and NY and the east coast, please let me know!

As for Christmas, I think I can now officially start singing carols without people getting annoyed. I absolutely love this time of year - it's summer, it's hot, you can swim all day, it's uni/school holiday time, it is my birthday, my Mum's birthday, one of my best friend's birthday, my cousins birthday and there are several large family parties going on. A hot Christmas is what it is all about. I've only ever had one cold/snowy Christmas, when I was in Italy. Granted it was one of the best Christmas's ever; we went ice skating in the town square, had a seafood lunch, got to play in the snow, and do all those things I've only ever seen in the movies. So this year, while Christmas itself will be hot as usual, I'm hoping for snow in America so I get a cold New Years.

Now, enough about Christmas for now.


I love this bread. It is so incredibly moist (as awful as that word is) with soft chunks of fresh banana and a delicious chocolate kick. There is a definite banana flavour to this bread, but I would not go as far as to say it is exactly like banana bread. You could probably eat this bread at any time of the day – its light enough for breakfast. The chocolate is not heavy or thick and the bread itself is more cake-like then bread like.

Level of Difficulty: Relatively easy

Average Cost: Not expensive at all
Main Ingredients: banana, cacao powder and raw honey
Occasion: Any damn time – even breakfast
Menu Options: Remember, raw cacao powder and raw honey have a much stronger taste than regular cocoa powder and honey, so you may have to alter measurements if you don’t have these ingredients. I do not believe Greek yoghurt is necessary, but I am not sure if the batter will be as thick or fluffy if you use normal yoghurt. You could always add a variety of nuts and dried fruit to this, swirl through peanut butter, nutella or melted chocolate, or glaze the top of the bread with cream cheese frosting. However, in an effort to keep this healthy, I’ve stuck with the basics.

Inspired by: Full Measure of Happiness and PB & Peppers. Just so you know what I mean when I say this – I decided I wanted to make a healthy chocolate and banana bread, so I went about researching ingredient substitutes and looking at some recipes online. These two recipes were my favourite and so by looking at these two recipes and ingredient substitutions and from my own knowledge of baking (which is limited) I came up with my recipe. In no way is my recipe barely adapted or just altered from these two amazing recipes, it is entirely its own. However if you are looking for two other great recipes, these would be my suggestions.

Makes 12 slices – nutritional values are for one slice.


Please read the note at the end of this recipe.

What you need:
1 ½ cups whole wheat flour
½ cup raw cacao powder
½ tsp salt
1 tsp baking powder
½ tsp baking soda
2 large bananas, mashed
2 eggs
1 tsp vanilla
¼ cup raw honey
170 g Greek yoghurt (1 tub of plain Chobani was what I used)
½ cup dark chocolate chips (or your choice of chips)

What to do:
Preheat the oven to 180 degrees Celsius. Grease a bread pan well (I use oil spray and make sure the pan is liberally covered in it)

In a medium sized bowl combine the dry ingredients (the first six). Stir well.

In a large bowl, beat together the bananas, eggs, vanilla, honey and yoghurt. Use a stand or handheld mixer. Make sure you mix these ingredients together well, though if little chunks of banana remain that is fine.

Slowly combine the dry ingredients with the wet, using the mixer to mix together the ingredients. Be very careful not to overmix here – make sure a few little specks of flour remain in the batter.

Add the chocolate chips and stir in with a wooden spoon. This is when the last of the flour should disappear.

Pour the batter into a regular bread pan and bake in the oven for 45 minutes or until a toothpick inserted into the batter comes out clean. ***

As the bread is soft, allow to cool for a little bit before slicing. I would allow to cool completely, because if the bread is too hot when you cut it, it will fall apart.

* This is a great trick = Cover the bread with foil for the first 30 minutes of baking. This will prevent the bread from browning too quickly, as is what happens when honey is used instead of sugar in baking. Then remove the foil for the final 15 minutes of baking and keep an eye on the bread to make sure it does not burn. If you do not do this, your baking time will vary and I am not sure how long it will take.

Bread will last for three-five days. After that, I’d be wary – it goes very soft.