Tuesday, 13 August 2013

Apricot and Chocolate Oat Bar-Muffins


Two posts in a week. This is a record for me at the moment.  And in fact, two healthy food posts in a week.

I know I say stuff like this regularly, but I cannot oversell these oat bar-muffins. I am only calling them 'bar-muffins' because I don't know what else to call them. They are soft, chewy and filled with all kinds of delicious things, like chocolate and apricot.


And they are rather healthy too - they're made with oats, almond meal, LSA, almond milk, and unsweetened applesauce. There is no sugar - only honey. There is also no butter, just a few tablespoons of oil. If you use natural dried apricots with no added sugar and dark (bittersweet) chocolate, you've got a phenomenal treat with little sugar.


I love these as an afternoon pick-me-up, a morning snack or a quick treat after a workout. They have a decent amount of carbs, protein and fats. I actually should add peanut butter to the ingredient list because I absolutely love to top these with a large spoonful of crunchy peanut butter. I love the crunch it adds to the soft oat bars, and peanut butter is a great addition to any chocolate treat.


Recipe adapted from the ever amazing edible perspective.

Makes 15 muffin sized treats.

What you need:

2 cups oats
1/2 cup almond meal
1/3 cup LSA
2 tsp cinnamon
1 tsp baking powder
1/2 tsp salt
1 egg
2/3 cup almond milk
1/2 cup unsweetened applesauce
1/3 cup honey
3 tablespoons oil (your choice, I used EVOO)
3/4 cup dried apricots, chopped (if you buy them pre-diced it saves you chopping them up)
1/2 cup dark (bittersweet) chocolate chips

What to do:

Preheat oven to 180 degrees Celsius.

Spray and line 1-2 regular-muffin-sized tray with cupcake liners (you will need two muffin trays to make 15 treats, so you can either bake two trays at once, or if you’re like me and only have one tray, bake 12 treats and then 3).

In a large bowl, combine the dry ingredients (first six). Stir well with a wooden spoon until combined.

In a separate, medium sized bowl, whisk the egg. Add the milk, applesauce and honey. Whik together. Finally add the oil. Whisk into the mixture. Make sure there is no oil clinging to the top of the mixture and the honey is not clumped together.

Pour the wet ingredients over the dry ingredients and stir with a wooden spoon until well combined.

Stir in the apricots and chocolate until they are spread throughout the mixture.

Place approximately 2 large tablespoons of mixture into each muffin liner, making sure the mixture fills approximately 2/3 of the liner.

Bake for 20 minutes or until the tops are a dark brown and a skewer inserted into the centre comes out clean.

To eat, top with a spoonful of peanut butter. 

Sunday, 11 August 2013

Healthy Banana Coconut Pancakes


I know I promised these last week, but the week just got away from me. So therefore you will not be bored with a post about my life this week, rather two food posts.

The first of which is these amazing pancakes. They are ridiculously easy to make as well as being healthy, delicious and an incredibly filling breakfast. I like to save time consuming breakfasts for the weekend, and while these do take longer than your average weekday breakfast, they are not difficult or frustrating.


If you use a very ripe banana, the banana taste is strong, and mixes well with the cinnamon and coconut. The pancakes are not fluffy, but thick and soft, and rather sweet, given the lack of sugar. If you find they are not sweet enough, perhaps because you used Greek yoghurt while I used a sweet plain yoghurt, then add more honey.

I am terrible at flipping pancakes, so please excuse my oddly-shaped and skewed pancakes. Feel free to top your pancakes with whatever you chose - I chose a homemade raspberry and chocolate sauce, a dash of maple syrup and yoghurt.


Makes five small-medium sized pancakes.

What you need:
½ cup oats
¼ cup coconut
1 tsp cinnamon
1 egg
1 banana, very ripe, mashed
1 tbsp plain yoghurt (Greek or otherwise)
1 tbsp almond milk
1 tsp honey

What to do:
In a blender or food processor, blend all of the pancake ingredients together until you have a thick, yellow batter.

Ensure your frypan is hot (over medium heat) and spray with olive oil / canola oil / coconut oil / any other oil you have.

Place 2 heaped tbsp. of batter on the frypan. This will make one small-medium sized pancakes. You can probably cook two or three pancakes on one frypan. Cook until the pancake batter bubbles on top and the bottom half of the batter sticks together. Flip the pancake once, and cook for another minute, until the pancake holds itself together.

Repeat for remaining batter, until five small-medium sized pancakes are made.

Thursday, 18 April 2013

'Apple Pie' Oat Cups

 
These pictures are ugly.

I am forewarning you of this. It's mostly because I'm too lazy to retake them (this was like my fifth attempt - with bad lighting and uncooperative food it was difficult to get a good picture) but also because it's hard to take a picture of these oat cups.

In spite of this, these oat cups are amazing. I make them once a week and eat one cup every few days so that I can enjoy them throughout the whole week. The recipe I have below is for apple-pie style oat cups, and unlike most 'apple-pie' style recipes, these really do a good job of imitating apple pie. It's obviously not quite the same, but they are a legitimate and delicious healthy substitute for a simple weeknight dessert or afternoon snack. They would also definitely work as a breakfast, or as a side dish for a brunch. They are amazing - even my parents liked them!


The recipe is not mine. I adapted it from Including Cake, using the ingredients I had on hand. It worked out brilliantly. For the original recipe, check it out here. While you're there, check out some of the other recipes there - I've made several before and I can honestly say I have not had a failure yet. For apple-pie oat cups, read below.


Makes three oat cups.

What you need:

For the cups:
1/3 cup oats
3 tbsp flour
1 tbsp LSA mix (or some other ground seed mix)
1 tsp cinnamon
1 tsp vanilla extract
1 tbsp honey
4 tbsp plain or Greek yoghurt

For the filling:
1 tbsp apple-rhubarb jam (or regular apple jam or regular rhubarb jam or some other jam, though another flavour will affect the apple-pie effect of the oat cups)
4 tbsp apple-cinnamon yoghurt (or combine regular yoghurt with a few teaspoons of applesauce and cinnamon)

What to do:

Preheat the oven to 180 degrees Celsius. Generously coat three muffin holes in a 12-hole muffin tin with butter or oil spray, coating the side of each muffin hole.

In a small bowl, mix the oat cup ingredients together and stir well until a shaggy, brown batter has formed. It will not be attractive.

Divide the mixture into the three muffin tray holes and using the back of a spoon (or your fingers), press the batter into the sides of the muffin hole so that the mixture makes a bowl shape (covers the bottom and sides of the muffin hole).

Bake in the oven for no longer than 10 minutes. Make sure the cups are browned, maybe a little golden, but only just cooked when you remove them.

Serve immediately or if serving later reheat the cups before serving. To serve, place the jam at the bottom of the oat cup and then dollop the yoghurt on top. Serve warm for the apple-pie effect. 


Thursday, 28 March 2013

Chocolate Hot Cross Buns


Happy Easter everyone!

Today I have a final Easter recipe for you - chocolate hot cross buns. This recipe is technically a throwback to last year, but I am reposting it with better pictures.

I'm now off to spend the weekend with my family (brother, parents and Dad's parents) but will be back next week for my uni break. Hope everyone is well!


So, about these chocolate hot cross buns. They are a perfect Easter treat - for your kids, for you, for brunch, for breakfast, for a snack; hell, for anytime and anyone. So, while they are not healthy, I promise you the taste makes up for it. Besides, a little bit of chocolate never hurt anyone.

This is a brilliant recipe for Easter. We had ours with cold orange juice, which was amazing, and some Carmello and Malteser eggs. Obviously, as this is an Easter themed treat, you can serve it with anything you want – but we loved having ours as a mini-brunch.


Recipe adapted from: Achieve Success

Makes 12 hot cross buns.

You will need:
-          1 ½ cups warm milk (I warmed mine in the microwave for about 45 seconds)
-          2 sachets of dried yeast (mine were 7g each)
-          ½ tsp salt
-          ½ tsp sugar
-          4 cups self raising flour
-          1 tbsp cocoa
-          1 tsp cinnamon
-          2 tbsp sugar
-          55 g butter, melted
-          1 egg
-          1 cup chocolate chips (I used ¼ cup dark (bittersweet) chips, ¾ cup milk chocolate chips)
-          1/4 cup water
-          1 tbsp sugar
-          Nutella / chocolate ganache (Recipes of mine which include ganache are: Malteser Brownies and Roasted Cherry Brownies with Roasted Cherry Ganache


What to do:

In a large bowl combine milk, yeast, salt and ½ tsp sugar in a large bowl. You have to mix this together well – I prefer to use a wooden spoon. Make sure the yeast is well mixed in. Cover loosely with plastic and leave bowl in a warm spot for 10 minutes or until the mixture is slightly bubbled on top. Mine was not very frothy/bubbly, but I left it for around 12 minutes and there were bubbles on the top of the mixture.

In another large bowl, sift flour, cocoa and cinnamon together. Add the 2 tbsp of sugar, frothy yeast mixture, butter and egg. Stir until the mixture comes together. It will be a thick, shaggy dough and very sticky. Turn the mixture out onto a well floured bench. Make sure your hands are well floured. Knead the dough until it is smooth. I had to knead mine for 10-15 minutes. It actually wasn’t working for a while, so if this happens for you, just do what I did – leave the dough for a minute or two and let it breathe. Then, retry. My dough wasn’t perfectly smooth, it was still a little sticky but it stuck together.


Place the dough in a lightly oiled bowl (I simply sprayed mine heavily with coconut oil). Cover the bowl with a plastic wrap. Leave the dough in a warm place so the dough will rise. I left mine for about 1 hour 10 minutes, but leave for up to 1 hour 30 minutes if the dough has not doubled in size. Mine doubled very quickly – in fact it rose over the bowl and stuck to the plastic. There is nothing wrong with this, it means you’ve done a good job. I went for a run while my dough was rising.

Once the dough has doubled in size, punch it down to its original size with your fist. This is the best bit of the recipe – it’s so much fun.

Turn down on to a floured surface and add the chocolate chips slowly, kneading the bread until the chips are evenly spread throughout the mixture. 
On a tray or in a large, deep pan, divide the mixture into twelve equal portions to make twelve balls of dough. Mine were not perfectly circular – not at all. But it doesn’t really matter, it still looks good. Make sure you place the balls about 1 cm apart, as the dough has to rise one more time.

Cover the balls with plastic wrap and leave the pan in a warm place until the dough has doubled in size. This takes about 30 minutes. I left mine for a good 30 minutes.

Preheat oven to 200 degrees Celsius. Bake the buns for 15 – 20 minutes. The top of the buns will be a golden brown and when a skewer is inserted into the dough it should come out clean. This may take less time depending on your oven – keep a good eye on it.

If you want to glaze the muffins, simply boil the water with the remaining 1 tbsp of sugar for about 3 minutes. Then brush the sugar mixture over the warm muffins.

After this, while the muffins are warm, make the crosses. I used a knife and Nutella to simply spread the nutella over the buns to make a cross. I also used, for these pictures, homemade ganache, which I simply placed in a zip lock bag, pushed down to one corner, cut the corner of the zip lock bag off, and squeezed out the ganache to make the crosses.

Serve warm. You can serve them at warm temperature, but warm, when the chocolate chips melt out into your mouth, is so much better. These buns can be reheated easily. I don’t know how long they last in the fridge, because we ate them all.

Wednesday, 6 March 2013

Chocolate Raspberry Cinnamon-Sugar Challah Sweet Rolls


Well, that's a long title.

But it pretty much covers everything that is in these AH-MAZING sweet rolls. I'm sure you've all had cinnamon rolls before, right? Well these are like that, except not at all. These rolls are even better, I kid you not.


Firstly, they are made of Challah bread; sweet, moist, soft, Jewish bread. If you've never had Challah, you're letting yourself down. Secondly, these don't have just cinnamon in, which is a bit of a strong flavour and often I find it overpowers dishes. These have chocolate and raspberries in. Chocolate and raspberries are a stellar combination, I am telling you.

Thick, rich, dark chocolate mixed with tart, ripe raspberries, covered in super sweet cinnamon sugar? Inside Challah bread? Rolled up delicately so in each bite there is an absolutely amazing tang of chocolate and raspberry? Yeah, that's what makes these rolls so special.


There are two parts to this recipe. The first involves making Challah bread from scratch. I do not have an original recipe for this. Instead I direct you to the ever brilliant Averie of Averie Cooks, whose Challah is delectable, light and best of all, not remotely time consuming. Now my advice is this: make her Challah bread dough. As she points out, it makes two Challah breads. Make one Challah bread when you first make the dough. Enjoy it warm, with some kind of butter. Love yourself for making something so amazing. Place the remaining dough in the fridge in a container, with the lid slightly popped open so the dough can breathe. Within five days use the remaining dough to make these sweet rolls. Or you can use the whole dough from Averie's recipe. Just remember to double all the other ingredients I list - if you double the dough used, you must double the filling.

Okay, now that we've sorted out the dough, let's move on to the good stuff.


Side Note: I'm no longer going to be putting up calorie counts or nutrition stats for my recipes. If you want them, there are ways to determine them online. As I no longer place such a high importance on my caloric intake, I feel I do not have to justify whether my recipes are perfectly healthy or not. Hint: this one isn't.

EDITED TO ADD: If you guys are looking for more amazing food, check out Buns in My Oven What's Cooking Wednesday Linkup. I entered these guys in.


Level of difficulty: Not incredibly difficult, but you have to be patient when making the dough (as per Averie’s recipe) and you have to be careful when rolling and cutting the sweet rolls. You will make a mess.

Menu Options: You can always change the fruit around in this. I’m sure strawberries, blueberries, blackberries and goji berries would all work. Other fruits may even work – mango or mango puree might work for this. Of course, depending on the size of the fruit you would need more or less fruit or else the recipe would get messy. You could always use milk chocolate, but I prefer dark chocolate with fruit.


Makes 9 sweet rolls

What you need:
Challah bread dough (as per above – ½ of Averie’s recipe)
90-100 g dark chocolate (at least 70% cocoa)
2 tbsp cream (loaded tbsp.)
1 cup frozen raspberries (do not use fresh raspberries. They will be too juicy and too hard to work with here)
2 tbsp sugar
2 tsp cinnamon

What to do:
Preheat the oven to 180 degrees Celsius. Grease 9 muffin holes in a regular 12-muffin-hole tray.

Place a large piece of baking paper on a bench. You want to do this as the filling of the sweet rolls is very runny and you will get your bench horribly messy if you don’t put the paper down. I’m warning you.

First, make the chocolate ganache. On a stove over low heat, in a small saucepan, combine the chocolate and cream. Stir until the mixture is well combined and thick. Make sure there are no streaks of cream; it should be entirely chocolate. Take the saucepan off the heat and leave the ganache to cool.

In a small bowl, combine the sugar and cinnamon well. The sugar should turn a dark cinnamon-y colour. Taste, and add more cinnamon if so desired. I would still ensure the sugar is the overwhelming taste, as you need the sweetness from the sugar for the sweet rolls.


Place the cup of raspberries in the microwave and microwave for 30 secs. They should be soft, but not yet runny.

Flour your hands and a rolling pin lightly. Roll out the Challah bread dough until it is flat. The dough will only be 1-2 cm in height. Make a rectangle shape with the dough, using a clean knife to cut off extra bits if necessary. Try to get the dough to roll out to be around 30 cm x 13 cm. This is merely approximate however, and you might be able to make a bigger or smaller rectangle.

Over the base of the dough, layer the chocolate ganache. It will make the dough go soft if it is still hot, so make sure it has cooled slightly. Make sure the chocolate covers the entire dough.

Top the chocolate ganache with the raspberries, spreading them evenly over the chocolate.

Spread the sugar over the top of the raspberries. It will dissolve into the chocolate-raspberry mixture. Do not worry about this. Keep spreading the sugar around evenly until you have used it all.


Roll the dough up tightly. By this, I mean roll the long length of the dough to the other long length of the dough. This is very hard to do. You have to roll the dough evenly as you go. It will get messy.

Using a clean knife, cut the rolled dough into nine even pieces and place each piece in a greased muffin hole. This is where it gets messy. Let it be messy – the more chocolate and raspberries that leaks onto the dough, the more delicious it looks when cooked (even if it doesn’t look good pre-cooking). Trust me on this one.

If you make more than nine, or less than nine, that is fine. Sometimes that happens with dough.

Cover the entire muffin tray with a piece of plastic wrap and let the dough rise in a hot place for approximately 1 hr 20 minutes. This may depend on the heat of your kitchen or whether you are using fresh dough or refrigerated dough. Once the rolls are at the top of the muffin tray, place them in the oven. If they are not at the top by the time the 1.20 mark rolls around, put them in the oven anyway. They rise astonishingly fast in there.

Place the sweet rolls in the oven for 10-15 minutes. Keep an eye on them. They not only rise fast, but you do not want to overcook the bread or burn the chocolate. If you are unsure of their progress, touch the dough. If it springs back slightly and is a golden brown, they are cooked. The chocolate might look black, but it will be okay.

Serve warm. If you want, serve it with the drizzle from this recipe, for extra decadence. 


Thursday, 29 November 2012

Apple Banana Walnut Danish


This is my 100th published post. Wow. I can't believe 100 posts ago I was saying hello to absolutely no one, and now I have written 100 posts. Sometimes it is a struggle, doing this, especially on holidays, when I just want to curl up in air conditioning, swim and eat all day. But other times, it is the best thing I do all day. I love every single comment I get, every single page view. I am so thankful for everyone who takes the time to read this blog. You make me very happy.

In other news about me - I got my final marks back for this semester of uni. Safe to say I passed and have one more year left. This time in a month I will be in America with my lovely friend Meg, who lives in Boston. Holidays are going well so far and this weekend is shaping up to be a good one - heading out tonight with my high school girlfriends, tomorrow is one of my best friend's (Will, I've mentioned him before I believe) birthday, and spaghetti pie will be made and consumed over the weekend. 


Now, onto these amazing danishes.

This is probably my favourite thing I’ve made this year, apart from those Skinny Fudgy Banana Peanut Butter Brownies. I absolutely loved these danishes; I love pastry though. These are very easy to make and not that time consuming. If you don’t mind putting in a little bit of extra effort on a Sunday morning within an hour you can have the most amazing danishes fresh from the oven.

The apples are soft and perfectly caramelised. The cinnamon, vanilla, banana, raisins and walnuts really just add a bit of texture, flavour and difference to the danishes. These guys beat regular apple danishes, because of the faint banana flavour, the crunch of the walnuts, and the chewy raisins. When fresh from the oven the apples practically melt in your mouth, and the pastry is perfectly crunchy.


While the drizzle is optional, I definitely recommend it. It is a very sweet icing, but perfectly delicious and very simple to make. It definitely adds something to the danishes; the sweetness of the icing contrasts with the tart apples and butter pastry. Worth the extra minute it takes to mix it together.


Makes 2 large danishes. Serves 4-6, depending on how you slice the danishes.

What you need:
2 apples
1 tsp lemon juice
2 tbsp brown sugar
2 tbsp butter
½ cup chopped walnuts
1 large mashed banana
1 tsp cinnamon
½ cup raisins/sultanas
1 tsp vanilla
2 sheets puff pastry
1 egg

For optional drizzle:
½ cup icing/confectionary sugar
1 tbsp milk

What to do:
Preheat the oven to 200 degrees Celsius.

Peel and core the apples, and chop into small pieces. In a large bowl, combine the apples, lemon juice and brown sugar.

Takeout the puff pastry sheets and allow to defrost.

Melt the butter in a frypan over medium heat. Add the apple mixture to the melted butter and let the apples cook for around 10 minutes. Mine took 9 minutes. What you want is the apples to caramelise so they have browned slightly and taste vaguely caramel. When the apples are tender, remove them from the heat. Allow to cool for a few minutes.

In a new bowl, combine the walnuts, banana, cinnamon, raisins and vanilla. Mix together well with a wooden spoon. Add the caramelised apples and mix together well. The banana mixture should be rather wet and stick to bits of the apple.

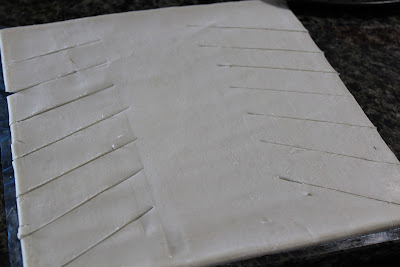
By this time the puff pastry should be well and truly defrosted. One sheet of pastry will make one danish. On the left side of one sheet of pastry, make horizontal or slightly angled cuts. Do the same on the right side of the pastry. Make sure the cuts do not meet and instead create a rectangle of pastry in the centre which has not been touched. See related picture.


Repeat for other pastry sheet.

Divide the apple and banana mixture between the pastry sheets so each Danish is filled with half of the mixture. Fold each corresponding strip of cut pastry over the filling, angling the pastry strips down the centre of the danish. The strips will cross over each other. Repeat for the remaining pastry strip, except the bottom two strips. Cross these strips with each other as well, but angle the pastry upwards. This way each end of the danish has an open end. See related picture.


Repeat for other pastry sheet.

Whisk the egg in a small bowl and wash both Danish pastries with it. This will help the pastry to brown in the oven.

Bake in the oven for 15 minutes or until the pastry has browned and is crunchy.

While the danishes are cooling, mix together the icing. In a small bowl, combine the two ingredients. When a thick paste has formed, place it in a ziplock bag. Smoosh the icing into one corner of the bag, cut off the corner and drizzle out the icing over the danishes in any pattern you chose.